#fullstack
#nextjs
Michał Uzdowski
Building a full-stack application with Next.js: A modern development journey
Welcome to Binary Brain, fellow code adventurers!
Today, we embark on a modern development journey to construct a full-stack application using the innovative features of Next.js. Let’s harness the power of this top-tier framework to create an application that’s as seamless as it is powerful. No prior experiments needed — just pure building from scratch with the latest tools at our disposal.
The Goal: A Full-Stack To-Do Application
The goal of today’s exercise is to demonstrate how Next.js can be leveraged to handle full-stack web development, making it easier for developers to manage and intertwine their backend logic with frontend displays. By the end of this session, you’ll have a fully functional web application with both the server-side and client-side developed, integrated, and deployed within the Next.js environment. This approach not only improves your development workflow but also empowers you to build more complex and scalable applications efficiently. Here’s what we’ll cover:
- Recreating the API: We’ll start by taking the RESTful API we initially built with Express in the Building a RESTful API with Node.js and Express: Server Yoga for Your Data article and recreate it using Next.js. This process will involve utilizing neat latest features within the Next.js framework, which allows us to handle backend processes seamlessly.
- Developing the Frontend: Once our backend logic is in place, we’ll develop a frontend interface for it using React, which is natively supported by Next.js. To make it even easier I recommend dipping your toe first with Building Your First React App: A Misadventure in Coding. This step will showcase the power of Next.js in managing React components and pages, providing a smooth, integrated development process.
- Combining Frontend and Backend: By utilizing Next.js for both backend and frontend, we streamline our development workflow into a single, unified environment. This integration not only simplifies the development process but also enhances it, making it more efficient and manageable. We’ll be using Next’s latest features like server actions to enrich our developer experience. If you’re new to Next.js or any other frameworks, I recommend starting with An Extensive Guide to Popular JavaScript Frameworks.
- Deploying the Application to Vercel: To round off our development journey, we will deploy our full-stack application to Vercel. Vercel is the platform behind Next.js and offers seamless hosting solutions that are optimized for Next.js applications. This step will involve setting up our project on Vercel and deploying it with just a few clicks, allowing us to see our application live on the web. We’ll be using GitHub for that, so make sure you reach for Mastering Version Control: Git, GitHub, and Beyond first.
Setting Up Our Next.js Universe
With Next.js, our project structure becomes more intuitive, blending server and client logic effortlessly — like a perfectly balanced yoga pose in the realm of web development. It’s also always good to have a cup of coffee by your side, so let’s dive in! Oh, and more thing — do yourself a favour and back your creativity up with Next.js Documentation. It might be a very useful map for this trip.
Step 1: Initiating a Next.js Project
If you haven’t yet experienced the magic of Next.js, now’s the time to dive in. As we’ve explored in our Comprehensive Toolbox for Web Development article, picking the right tools is crucial, much like selecting the perfect brew for a night of coding. Now run:
npx create-next-app@latest my-fullstack-app --ts
And answer some questions to set up your project.

Once the setup is complete, navigate to your project directory and start the development server.
cd my-fullstack-app
npm run dev
This sets up a new Next.js project with TypeScript and all the latest features. Visit http://localhost:3000 and witness your app’s first greeting to the digital world.
Step 2: Integrating Backend Logic with Server Actions
With Server Actions, backend logic is directly woven into our Next.js routes, ensuring a smooth flow between frontend interactions and server-side processes.
In your Next.js project, under the app directory, establish a folder called actions and add a todos.ts file for our backend logic:
// app/actions/todos.ts

// Mockup data
const INITIAL_TODOS = [
  { id: 1, task: "Master Next.js" },
  { id: 2, task: "Learn TypeScript" },
  { id: 3, task: "Build a Next.js app" },
];

export async function getTodos() {
  // Ideally, fetch todos from a database
  // for now, return a mockup array
  return INITIAL_TODOS;
}

export async function addTodo(task: string) {
  // Logic to add a todo
  // Ideally, save the todo to a database
  // For now, return a mockup object
  return { id: Math.random(), task };
}

export function removeTodo(taskId: number) {
  // Logic to remove a todo
  // Ideally, remove the todo from a database
  // For now, return the taskId
  return taskId;
}
Step 3: Crafting the Frontend with React Server Components
In this step, we’ll delve into the frontend setup. Our application is structured around React components, utilizing the robust Next.js, which seamlessly integrates server-side logic with client-side interactivity.
Detailed Breakdown of the Frontend Components
- Home Component (
app/page.tsx):
"use client";
import { useState } from "react";
import { getTodos, addTodo, removeTodo } from "@/app/actions/todos";
import { Button } from "@/components/button";
import { Todo } from "@/components/todo";

export type Todo = {
  id: number;
  task: string;
};

export default function Home() {
  const [todos, setTodos] = useState<Todo[]>([]);
  const [newTask, setNewTask] = useState<string>("");

  async function fetchTodos() {
    const todosFromServer = await getTodos();
    setTodos(todosFromServer);
  }

  async function handleAddTodo(task: string) {
    const newTodo = await addTodo(task);
    setTodos([...todos, newTodo]);
    setNewTask("");
  }

  async function handleRemoveTodo(taskId: number) {
    await removeTodo(taskId);
    setTodos(todos.filter((todo) => todo.id !== taskId));
  }

  async function handleInputChange(event: React.ChangeEvent<HTMLInputElement>) {
    setNewTask(event.target.value);
  }

  return (
    <div className="flex flex-col max-w-2xl mx-auto gap-4 p-12">
      <h1 className="text-center">Welcome to Your Next.js To-Do App</h1>
      <Button
        text="Load Todos"
        variant="success"
        onClick={() => fetchTodos()}
      />
      <div className="flex gap-4">
        <input
          className="px-4 py-2 bg-gray-700 rounded-lg"
          type="text"
          placeholder="Add todo"
          value={newTask}
          onChange={(event) => handleInputChange(event)}
        />
        <Button text="Add Todo" onClick={() => handleAddTodo(newTask)} />
      </div>
      <ul className="flex flex-col gap-4">
        {todos.map((todo) => (
          <Todo key={todo.id} todo={todo} handleRemoveTodo={handleRemoveTodo} />
        ))}
      </ul>
    </div>
  );
}
Functionality:
- The
Homecomponent serves as the central hub for our application, coordinating both the display and the interactions of the to-do list. - It handles state management for the to-dos retrieved from the server and for new to-do entries input by the user.
State Hooks:
todos: Manages the array of to-do items.newTask: Tracks the input field value for adding new to-dos.
Interaction Handlers:
fetchTodos: Fetches to-dos from the server and populates thetodosstate.handleAddTodo: Adds a new to-do to the server, updates the local state to include the new to-do, and clears the input field.handleRemoveTodo: Removes a to-do item both server-side and from the local state.handleInputChange: Updates thenewTaskstate as the user types in the input field.
UI Components:
- Utilizes a
Buttoncomponent for actions like loading, adding, and deleting to-dos. - Integrates an input field for new to-do entries.
- Maps over the
todosstate to render a list ofTodocomponents, each representing a to-do item.
- Button Component (
components/button.tsx):
type ButtonProps = {
  text: string;
  variant?: "primary" | "success" | "danger";
  onClick: () => void;
};

export const Button = ({ text, variant = "primary", onClick }: ButtonProps) => {
  let color = "";

  switch (variant) {
    case "primary":
      color = "bg-blue-700";
      break;
    case "success":
      color = "bg-green-700";
      break;
    case "danger":
      color = "bg-red-700";
      break;
    default:
      color = "bg-blue-700";
  }

  return (
    <button className={`${color} rounded-lg px-4 py-1`} onClick={onClick}>
      {text}
    </button>
  );
};
Props:
text: Label displayed on the button.variant: Determines the button’s styling based on its purpose (e.g., primary, success, danger).onClick: Function to execute on button click, handling various actions like adding or deleting to-dos.
Styling:
- Applies different background colors depending on the
variantprop to visually differentiate the types of actions (e.g., blue for primary actions, green for successful actions, red for deletions).
Functionality:
- Renders a button that reacts to user interactions, triggering defined behaviors such as fetching, adding, or removing items.
- Todo Component (
components/todo.tsx):
import { Todo as TodoType } from "@/app/page";
import { Button } from "./button";

type TodoProps = {
  todo: TodoType;
  handleRemoveTodo: (taskId: number) => void;
};

export const Todo = ({ todo, handleRemoveTodo }: TodoProps) => {
  return (
    <div className="flex flex-row gap-4">
      <li key={todo.id}>{todo.task}</li>
      <Button
        text="X"
        variant="danger"
        onClick={() => handleRemoveTodo(todo.id)}
      />
    </div>
  );
};
Props:
todo: The to-do item object, containing theidandtask.handleRemoveTodo: Function passed from theHomecomponent to handle the removal of a to-do.
Structure:
- Displays the to-do task within a list item.
- Integrates a
Buttoncomponent set to the “danger” variant for deleting the to-do, enhancing usability and interactivity.
Overview
This structured approach in the Home component using Next.js’s App Directory not only simplifies the development process but also enhances the application’s responsiveness and interactivity. By dividing the frontend into logical, reusable components (Button and Todo), we maintain a clean and manageable codebase while ensuring that the user interface is intuitive and efficient.
Each component is designed to handle specific aspects of the user experience, from entering new to-dos to interacting with existing ones, providing a comprehensive and engaging user interface. This modular design facilitates easier updates and maintenance, aligning with modern web development best practices.
Step 4: Deploying Your Full-Stack Application to Vercel
Deploying your Next.js application to the web allows it to be accessed by users around the globe. Vercel, the creators behind Next.js, provides a seamless deployment experience particularly optimized for Next.js applications. Here’s a step-by-step guide to deploying your application on Vercel:
Sub-Steps for Deployment
- Create a GitHub Repository
Action: Go to GitHub and create a new repository for your project. If you need help, check out Mastering Version Control: Git, GitHub, and Beyond.
Purpose: Storing your project on GitHub not only ensures that your code is safely version-controlled but also allows Vercel to integrate directly with your repository for continuous deployments.
- Push Your Project to GitHub
Preparation: Initialize your local project directory as a Git repository if you haven’t already done so by running git init.
Action: Add your project files to the repository using:
git add .
git commit -m "Initial commit"
git branch -M main
git remote add origin https://github.com/yourusername/yourrepository.git
git push -u origin main
Purpose: This uploads your local Next.js project to GitHub, making it accessible for deployment services like Vercel.
- Create or Log Into Your Vercel Account:
Action: Visit Vercel's website and either sign up for a new account or log in if you already have one (preferrably with GitHub account as this makes automating deployments a breeze).
Purpose: This account will be used to manage your deployments, project settings, and more.
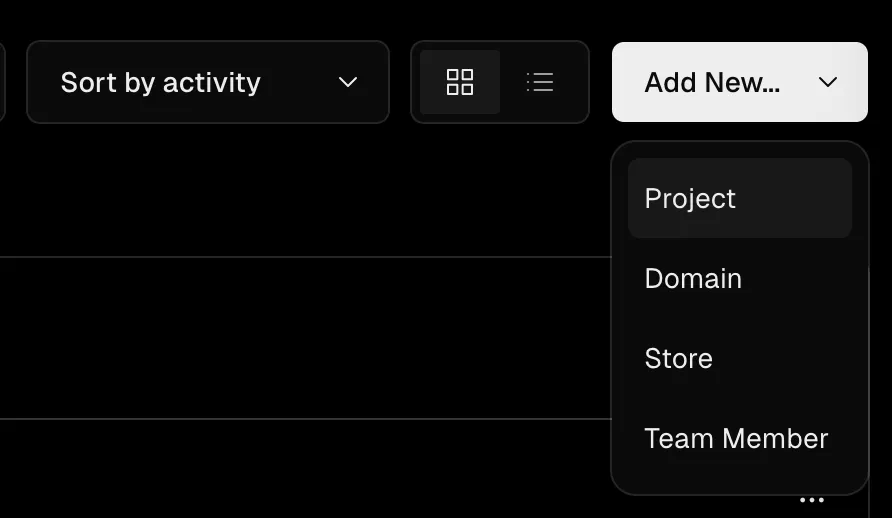
- Create a New Vercel Project:
Action: Once logged in, navigate to the dashboard and select ‘New Project’.
Purpose: This sets up a new deployment environment for your Next.js application.

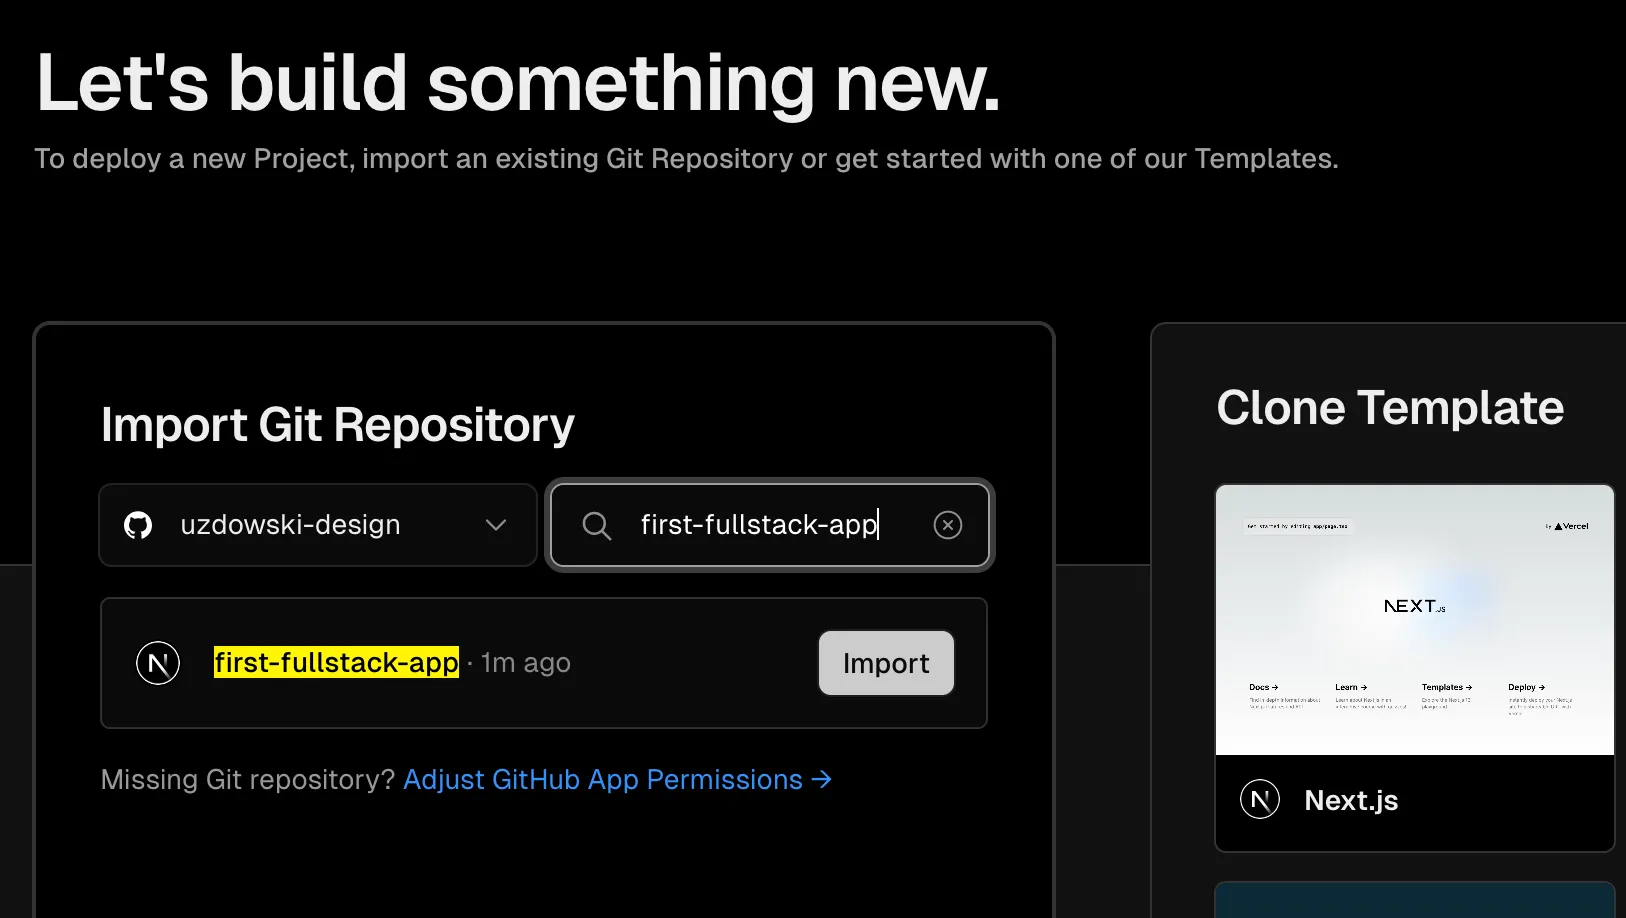
- Deploy from GitHub to Vercel:
Action:
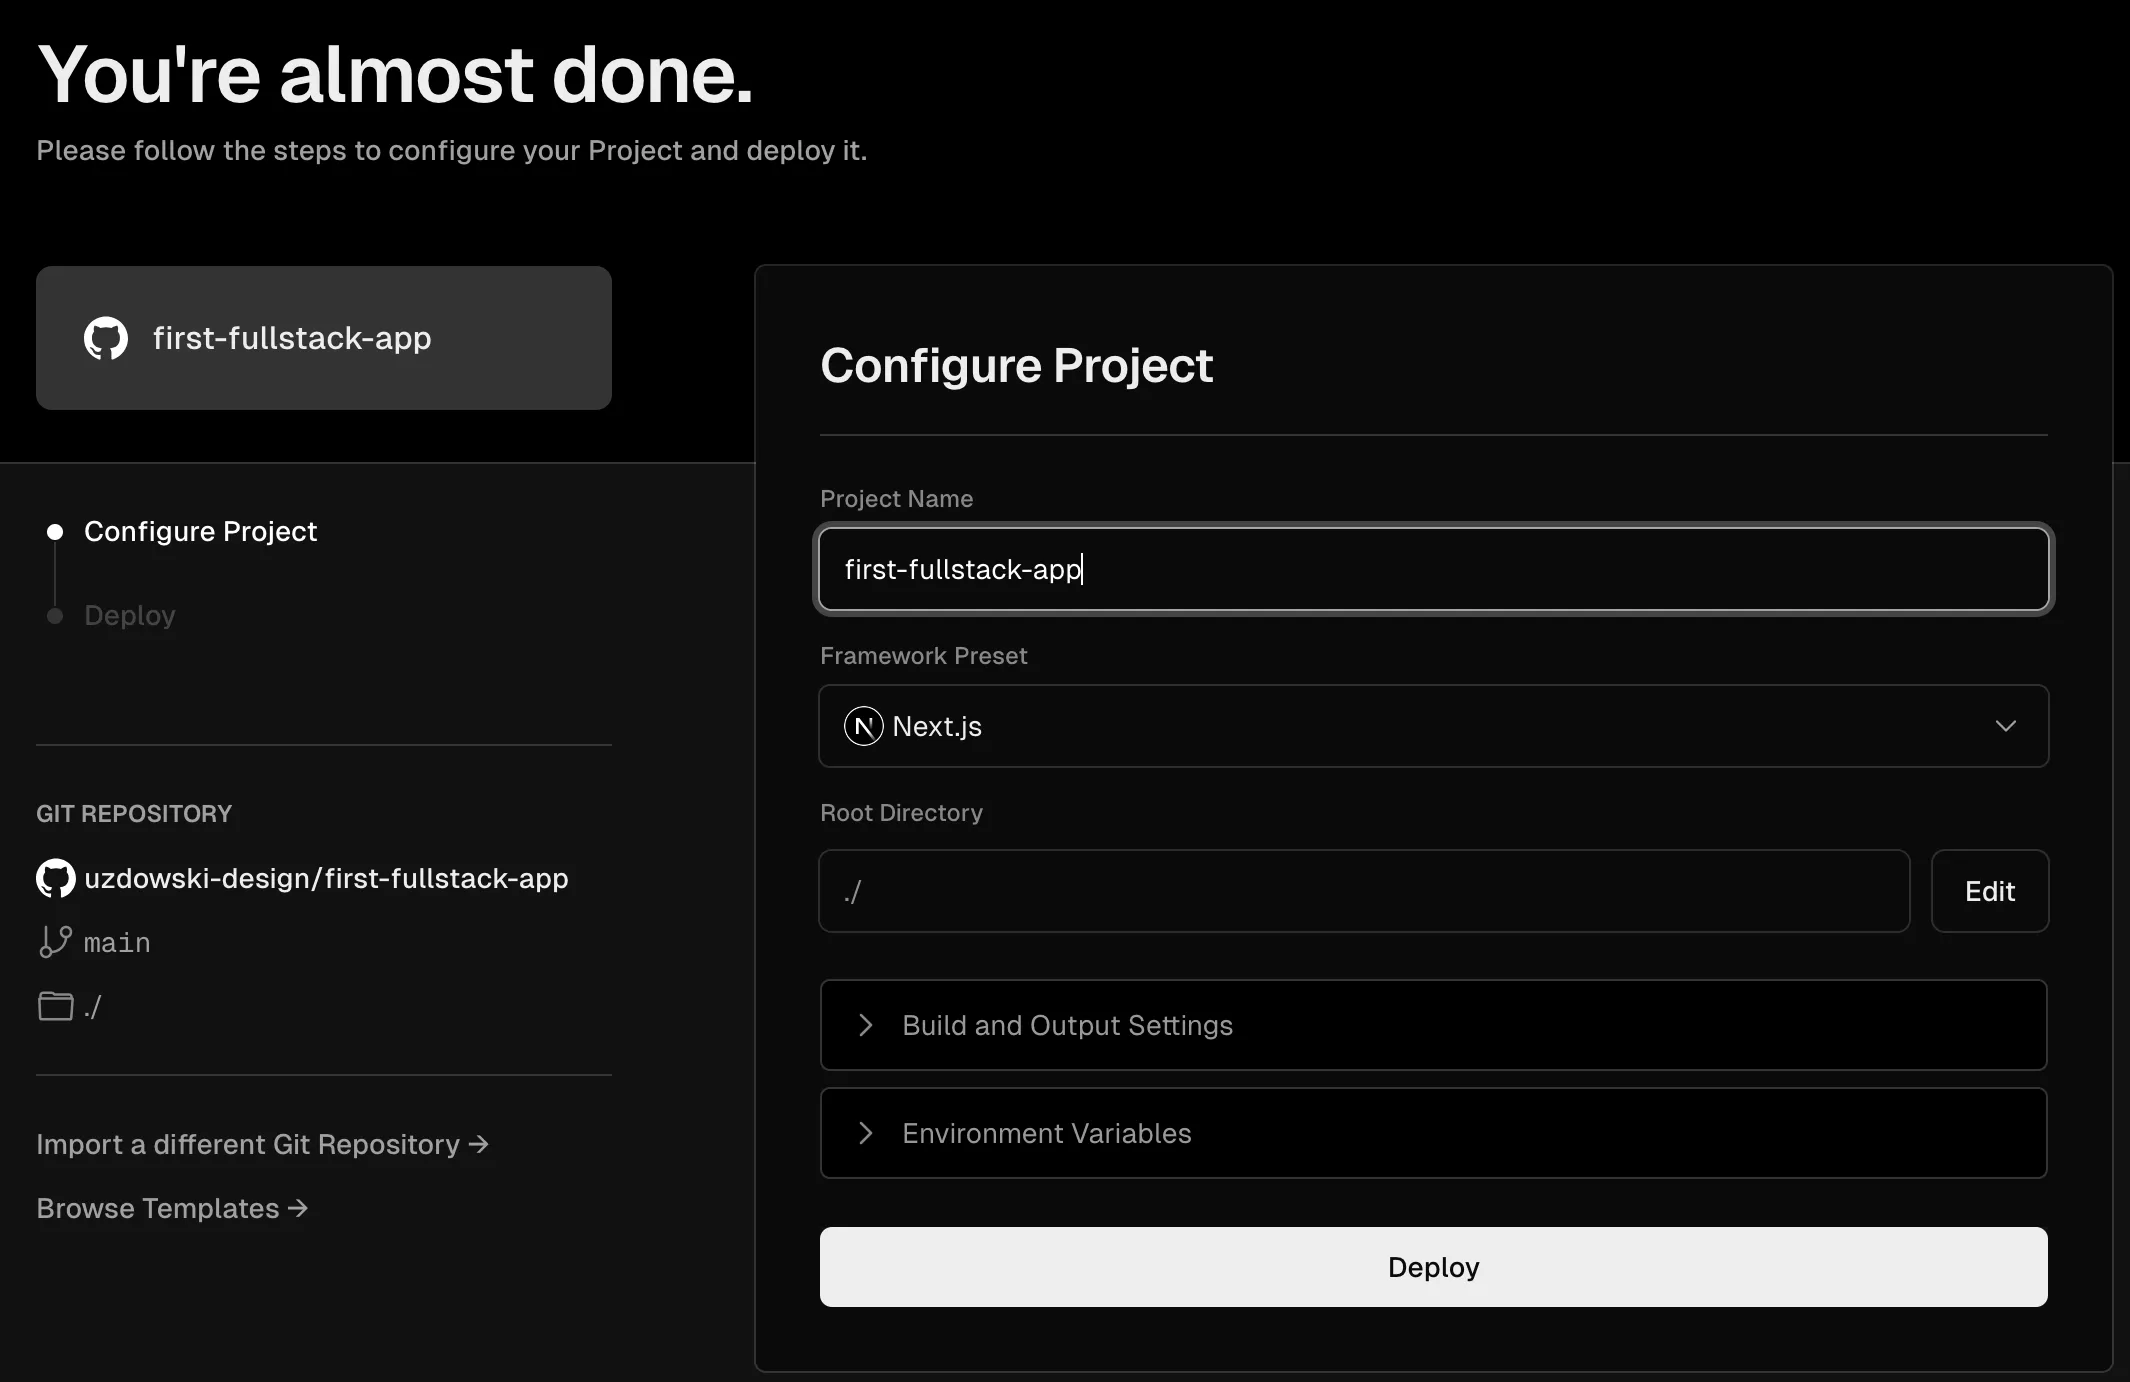
- In the Vercel dashboard, under ‘New Project’, find your GitHub repository and select it.

- Configure your project settings as required (such as build commands and environment variables). - Click ‘Deploy’.

Purpose: Vercel will fetch your code from GitHub, build it using the
settings and commands specified, and deploy it to a public URL.
Result:
Once deployed, Vercel provides a URL where your deployed application is
accessible. Obviously you can add your custom domain to properly shine in the web. Additionally, any future commits pushed to your GitHub repository
will trigger automatic redeployments by Vercel. You can find this tutorial’s app deployment here.
Final Step: Monitoring and Maintenance
- Monitoring: After deployment, Vercel offers analytics and performance metrics that you can monitor to see how your application performs under real-world conditions.
- Maintenance: Keep your application updated by regularly pushing changes to GitHub, which Vercel will automatically deploy, ensuring your application remains up-to-date with the latest changes.
Deploying with Vercel not only simplifies the process but also optimizes your Next.js application for the best performance. This step-by-step approach ensures that your full-stack application is not just built with efficiency but also hosted robustly to handle real user traffic seamlessly.
Conclusion
Crafting a full-stack application with Next.js has never been more straightforward. With cutting-edge features like the App Directory Routing and Server Actions, your development process remains clean and integrated. Stay tuned for more coding escapades at Binary Brain, where we make tech exciting and accessible. Happy building!